How do you create a responsive character controller? What does responsive even mean for this? What’s wrong with using standard physics equation for this? This blog post will cover these questions and how you how to build responsive movement in Godot.
A lot of this post is inspired by great resources that you should also check out:
- Math for Game Programmers: Building a Better Jump
- Math for Game Programmers: Fast and Funky 1D Nonlinear Transformations
- Game Feel, by Steve Swink
Note that this post will demonstrate using Godot 3.4. KinematicBody2D has been renamed CharacterBody2D in Godot 4.
Game Feel
In Swink’s book, he notes that one of they keys to real-time character controller “feeling good” in a game is responsiveness. To describe what responsiveness is, he borrows a concept from music: Attack, Decay, Sustain, Release (shortened as ADSR). To look at how responsive a character controller is, we can look at the ADSR of how the player’s velocity responds to input.
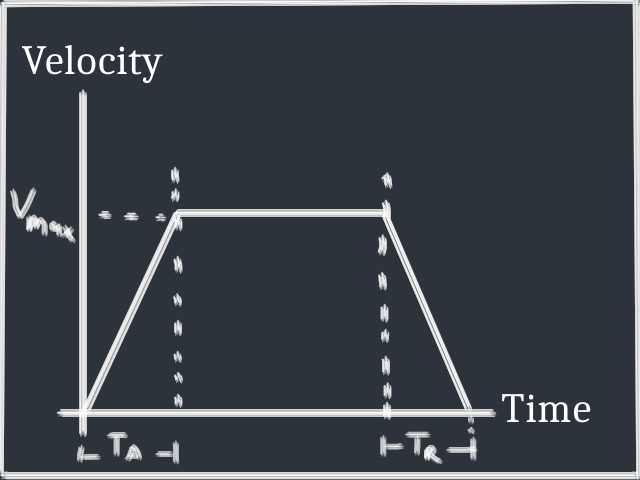
We have a few variables of interest to us:
- $V_{max}$, the maximum velocity the player can reach
- $T_A$, the attack time e.g. the time it takes to reach the max speed from zero when the player is holding an input
- $T_R$, the release time e.g. the time it takes to get back to zero velocity from the max when the player releases input
Our movement can be considered responsive if it responds quickly to player input, both in terms of attack and release. This begs a question: why not set both $T_A$ and $T_R$ to zero? With a character controller like this, the player reaches $V_{max}$ as soon as the input is pressed, and goes back to zero velocity as soon as the input is released.
It’s true that this controller would be responsive, but we lose another key aspect of game feel that Swink describes in his book: expressiveness. This concept is also touched on in this GDC presentation. Essentially, we can consider controls expressive if they allow the player to reach a wide range of values rather than just a single value. A good example with jumping is Castlevania vs. Mario. When the player jumps in Castlevania, it is always a fixed arc. But in Mario, the player can vary the jump depending on how long the input is pressed.
Our super responsive controller is like the Castlevania jump, the player can only move at one specific velocity. We want our attack and release times greater than zero, and our player’s velocity to ramp up and down when inputs are pressed.
Physics-based controller
The most natural way to add some ramping to our velocity is to add acceleration to our system using the standard kinematic equations. The way this is typically done is by exposing a constant value of acceleration $a$ in a character controller. How would this look in our ASDR graph? Well, we know that a constant acceleration means a linear increase/decrease in velocity, so we end up with something like the trapezoid shaped graph from above.
This gives a pretty good controller, but I argue that we could do even better.
What are the limitations of the trapezoid shaped graph? If we want to reach the maximum velocity quickly, we have to set $T_A$ and $T_R$ to small amounts. But then the player doesn’t have us much time to be expressive. How can we allow for larger values of attack and release time while still having things feel responsive?
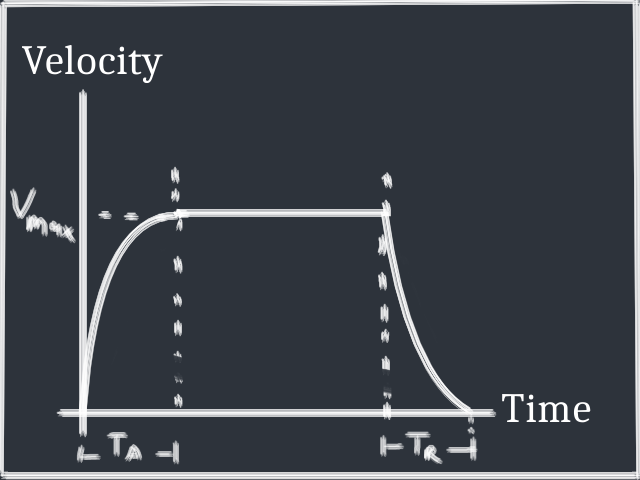
Curve your enthusiasm
There’s no reason we have to limit ourselves to a constant acceleration (and therefore linear velocity changes). If we drew curves in the attack and release section of our ADSR graph, how should they look to accomplish our goals?
We want velocity to react quickly when the player presses and releases an input, so the initial increase/decrease in velocity should happen quickly. The change in velocity can move more slowly after the input has been held/released for a while, giving the player more time before the maximum velocity for expressiveness. So, we want something like this:
It was easy enough to draw, but how can we implement it in Godot? We could try writing our character physics code with non-constant acceleration, but let’s try something else…
Normalized functions
Inspired by “Math for Game Programmers: Fast and Funky 1D Nonlinear Transformations”, we’re going to make things simpler for ourselves by restricting our input and output ranges to $[0, 1]$ and writing our curve equations that way.
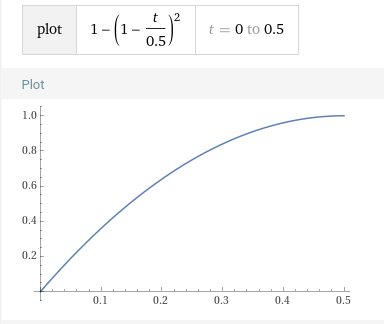
What function should we use for the attack portion of our graph? I’m going to choose $$v=1-(1-t)^2$$, as it fits our criteria and will make some future things easier.
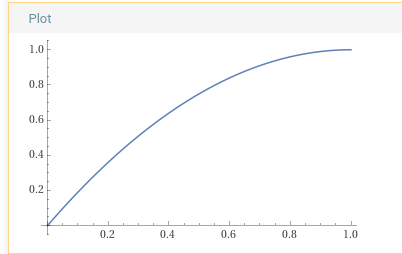
Notice that the graph starts out increasing quickly, but smoothly slows down to its maximum. Also notice that the domain and range of our function is $[0, 1]$.
We can slightly adjust this function to get a curve that fits our criteria for the release portion: $$v=(1-t)^2$$
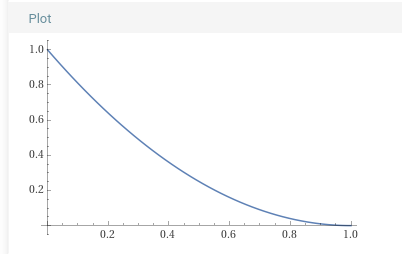
Just like our “attack” graph, our “release” graph starts quickly and slows down as it reaches the final value (zero, in the case of release).
Building it
Now that we have our equations, we can finally move on to implementing things! How should we do it? To know what player’s velocity should be, we need to know how long the player has held (or released) the input.
One option for for doing this is to track this as additional state, but this could get messy. Adding another state to track creates a new avenue for bugs. Is it possible to move on without it?
Take another close look at our graphs. The one state we need to track is the player’s velocity, but if we know that, we can also figure out where we are in the x-axis (time) of the graph. Our functions are invertible! Let’s solve our equations for $t$:
Attack equation: $$t=1-\sqrt{1-v}$$
Release equation: $$t=1-\sqrt{v}$$
Let’s set up a simple scene in Godot to implement these into a character controller:
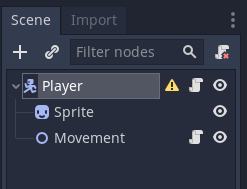
At the root, we have a KinematicBody2D node which provides an interface for movement with collision handling. Under it, we have:
- A sprite containing the visual of the player
- A Node2D to contain our movement interface
The top level script is very simple:
extends KinematicBody2D
var velocity: Vector2 = Vector2()

func _physics_process(delta):

    velocity = $Movement.handle_move(velocity, delta)
    move_and_slide(velocity)
It’s good practice to keep systems that don’t need to be coupled isolated. In this case, we are going to isolate most logic into a script on our Movement
node, and let other nodes interface with it through a single method: handle_move. Note that the input to move_and_slide is a linear velocity, so it should not be multiplied by our delta timestep.
Let’s start work on our Movement node’s script by writing handle_move:
extends Node2D

export var max_speed: float = 800
export var t_max_speed: float = 0.75 # In seconds
export var t_stop: float = 0.75


func handle_move(velocity: Vector2, delta: float) -> Vector2:
    """ Handle movement related state variables that change each timestep
    """
    var input_velocity: Vector2 = Input.get_vector("move_left",
        "move_right", "move_up", "move_down")

    if input_velocity.length_squared() > 0:
        return velocity_accel(velocity, input_velocity, delta)
    else:
        return velocity_decel(velocity, delta)
Our exported variables in this script correspond to what we want to be able to tune for the player’s movement:
max_speedcorresponds to $V_{max}$t_max_speedcorresponds to $T_A$t_stopcorresponds to $T_R$
The velocity_accel and velocity_decel functions will calculate a new velocity given the previous velocity, and the amount of time passed.
We read an input vector that describes which direction the player’s current input is pointing (note that you should configure these input actions and their corresponding bindings under the Project Settings > Input Map). If the input is greater than zero, it means the player is pressing an input, so we will return velocity_accel which will implement our attack equation. If no input is held, we will return a velocity corresponding to our release equation with velocity_decel. Note that velocity_decel does not need our input vector, because it is only active when no input is present.
Now, let’s work on velocity_accel:
func velocity_accel(v_0: Vector2, direction: Vector2, delta: float) -> Vector2:
    """ Given a positive initial 2D velocity and a delta time, return a positive
    new velocity based on a custom 'game-feel' curve.
    """
    v_0 = v_0.clamped(max_speed)

    # Map to [0,1] to simplify
    var speed = v_0.length() / max_speed
We start by making sure the input is not over our max speed, and normalize it so we can plug it into our equations. Next, we calculate what value of $t$ our current v_0 corresponds to:
# Derive where we are in time [0,1] based on current speed
    var t: float = 1 - sqrt(1 - speed)
    if is_nan(t):
        # speed is 1, so t is 1
        t = 1
To get our new value of t we can simply add the delta time. But, how do we handle our configurable t_max_speed? We want to squish or stretch the time axis of our graphs depending on how long we want it to take the curve to go from 0 to 1. We can accomplish this by dividing the $t$ in our equations. For example, if we wanted our t_max_speed to be 0.5:
Which means we can write our new value of t as
var t_new: float = t + (delta/t_max_speed)
And lastly, we calculate what the new velocity should be for t_new:
    # Calculate speed based on new t
    if t_new >= 1:
        return direction.normalized() * max_speed
    var speed_new: float = clamp(1 - (1-t_new)*(1-t_new), 0 ,1)
    return direction.normalized() * speed_new * max_speed
Above, we can calculate the speed independent of the direction because we know the direction of movement is given by the player input. speed_new will range from 0 to 1, so we multiply by our max_speed at the end to get the final velocity.
We can work similarly to implement velocity_decel with our release equation:
func velocity_decel(v_0: Vector2, delta: float) -> Vector2:
    """ Given a positive initial 2D velocity and a delta time, return a new positive
    velocity that is slower, based on the Player's parameters.
    """
    var speed = v_0.clamped(max_speed).length() / max_speed
    var t: float = 1 - sqrt(speed)
    if is_nan(t):
        t = 1
    var t_new: float = t + (delta/t_stop)
    if t_new >= t_stop:
        return Vector2()
    var speed_new = clamp((1-t_new)*(1-t_new), 0, 1)
    return v_0.normalized() * speed_new * max_speed
Our final Movement script will look like:
extends Node2D

export var max_speed: float = 800
export var t_max_speed: float = 0.75 # In seconds
export var t_stop: float = 0.75


func handle_move(velocity: Vector2, delta: float) -> Vector2:
    """ Handle movement related state variables that change each timestep
    """
    var input_velocity: Vector2 = Input.get_vector("move_left",
        "move_right", "move_up", "move_down")

    if input_velocity.length_squared() > 0:
        return velocity_accel(velocity, input_velocity, delta)
    else:
        return velocity_decel(velocity, delta)


func velocity_accel(v_0: Vector2, direction: Vector2, delta: float) -> Vector2:
    """ Given a positive initial 2D velocity and a delta time, return a positive
    new velocity based on a custom 'game-feel' curve.
    """
    v_0 = v_0.clamped(max_speed)

    # Map to [0,1] to simplify
    var speed = v_0.length() / max_speed

    # Derive where we are in time [0,1] based on current speed
    var t: float = 1 - sqrt(1 - speed)
    if is_nan(t):
        # speed is 1, so t is 1
        t = 1
    var t_new: float = t + (delta/t_max_speed)

    # Calculate speed based on new t
    if t_new >= 1:
        return direction.normalized() * max_speed
    var speed_new: float = clamp(1 - (1-t_new)*(1-t_new), 0 ,1)
    return direction.normalized() * speed_new * max_speed

func velocity_decel(v_0: Vector2, delta: float) -> Vector2:
    """ Given a positive initial 2D velocity and a delta time, return a new positive
    velocity that is slower, based on the Player's parameters.
    """
    var speed = v_0.clamped(max_speed).length() / max_speed
    var t: float = 1 - sqrt(speed)
    if is_nan(t):
        t = 1
    var t_new: float = t + (delta/t_stop)
    if t_new >= t_stop:
        return Vector2()
    var speed_new = clamp((1-t_new)*(1-t_new), 0, 1)
    return v_0.normalized() * speed_new * max_speed
And we’re done! Here’s how it looks in action:
You can easily tweak the timing parameters depending on how long you want the speed to ramp up and down.
The movement system for a game I’m working on is based on this:
Comments
With an account on the Fediverse or Mastodon, you can respond to this post. Since Mastodon is decentralized, you can use your existing account hosted by another Mastodon server or compatible platform if you don't have an account on this one. Known non-private replies are displayed below.