As your Godot project grows, it’s incredibly important to keep your code and node structure organized to avoid it from resembling a particularly notorious kind of pasta. The Godot best practices recommends having scenes that are singularly focused and loosely coupled. How can we achieve that in practice? In this article, I will explain what is often called the Component pattern and go through some real-world examples from my recently released game Twinkle Stardust’s Catnap Chaos to demonstrate how you can use it.
The Component pattern
The key idea behind the component pattern is: rather than defining how something behaves via a chain of inheritance, we can
define its behavior by the components that compose it. A common example is a Hitbox/Hurtbox component. For any object that has a
hurtbox component, if it comes into contact with an object that has a hitbox component, the hurtbox will tell its owner to take damage.
Entities that require a hitbox don’t need to inherit from some HitboxEntity, they can just contain the Hitbox component.
We will look at more examples shortly, but for now let’s consider what makes a good component.
Isolation
To avoid unnecessary dependencies, components should be as isolated as possible. Ideally, their behavior should not depend too much on the object they are affecting. In Godot terms, this means that they probably shouldn’t directly change the state of their parent, or other state elsewhere in the game.
If a component can’t change state outside of it, how can we use it? We have a few options:
- Provide functions for its owner to use
- Allow users of the component to read its state
- Use signals
Reusability
The component pattern doesn’t make much sense for behaviors inherent to a single entity. You should avoid using this abstraction just for the sake of it, and instead focus on how you could use it to simplify your codebase. What behaviors are commonly present in your game?
Single responsibility
The single responsibility principle for a component means that there should be only one reason for a component to change. This ensures that:
- If we want to change a behavior, we only need to do it in one place
- When we change one behavior, we don’t unintentionally break a different behavior
In the hitbox component example, notice that we typically use a separate hurtbox component for the behavior of “this entity can be hurt”.
Even though these components feel similar, keeping them separate allows us to use them more flexibly. For example, we could have a Crate
that has a hurtbox to take damage, but isn’t able to apply damage to other entities.
Configurability
To maximize reusability, a component should also be configurable. For example, if we have a Jump Component, we would probably want its owner to be able to configure things like jump height and time.
Simple Interface
Because we prefer an isolated component that doesn’t directly change state, it is helpful for a component to provide a clear and easy to use interface. A component that exposes a single function is obvious to use, while a component with a dozen functions that must be called in a specific order would be a headache to deal with.
A tour of example components
The following components are not toy examples, but real components used in Catnap Chaos.
Speed Boost
This is one of the first components I created for Catnap Chaos. Unsurprisingly, it encapsulates the behavior of a speed boost. The node structure is pretty simple:
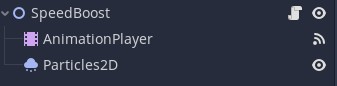
There are some particles to accompany the speed boost, a mysterious AnimationPlayer, and a root node with a script. The script’s interface is only
two different functions:
func speed_boost(speed: float, double_boost: bool,
                 long_boost: bool, scale_mult: float):
func extra_speed() -> float:
The speed_boost function allows the caller to trigger a configurable speed boost. The extra_speed function allows a user of the component to read how much extra speed the boost is producing.
Internally, the AnimationPlayer adjusts how the speed boost varies over time. But because we expose a limited interface for nodes
that use this component, they don’t need to interact with or depend on the fact that we’re using an AnimationPlayer.
Notice that the component isn’t changing its owner’s speed directly. So how does it get used?
In Catnap Chaos, the component’s owner decides when speed_boost is called. Alternatively, other systems could check
if a node has this component, and decide to trigger the speed boost.
To actually apply the speed boost, it’s up to the owner to read extra_speed() and use it accordingly:
move_and_collide(velocity.normalized()*$SpeedBoost.extra_speed()*delta)
Because our component is isolated, it does not care that its owner is a PhysicsBody2D node in this case. An Area2D would also be able
to reuse the same component and decide how to apply the speed boost to itself.
Bumpable
One of my favorites! This component lets an object be “bumped”. The node structure is also very simple:
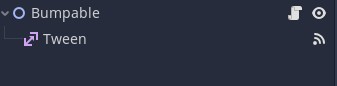
The interface for this component:
var velocity: Vector2
func bump(direction: Vector2, power: float, time: float):
func interrupt_bump():
signal bump_completed
signal bump_started
Like the Speed Boost component, Bumpable doesn’t change its parent. Instead, it provides a velocity for its parent node to read the effect of a bump. This lets an entity with multiple components figure out how to combine different components. For example, both Speed Boost and Bumpable are
components that affect velocity. But, because they don’t directly change an entity’s velocity, the entity that owns them can make sure they play
together nicely:
move_and_collide((velocity.normalized()*$SpeedBoost.extra_speed() + $Bumpable.velocity)*delta)
The bump can be triggered by other nodes by checking for the component:
func _on_Area2D_area_entered(area):
    var bumpable = area.owner.get_node_or_null("Bumpable")
    if bumpable:
        bumpable.bump(vel, 300.0, 1.0)
The signals are provided so that the Bumpable component doesn’t need to know anything about its owner’s animations. Instead, the parent node can use them to coordinate animations like:
func on_bump_completed():
    $SkeletonRoot/AnimationPlayer.play("Moving")

func on_bump_started():
    $SkeletonRoot/AnimationPlayer.play("Bumped")
Health Bar
To round it off, we’ll look at a different kind of component, the Health Bar. This component is used to display a health bar. It’s not intended to be used as a general health system, so it doesn’t contain any functionality for concepts like “healing” or “death”.
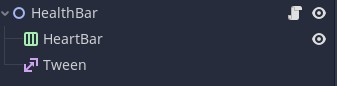
In its node tree, it most notably contains a HBoxContainer to display a row of hearts. The below image shows the component used in three different places: 1) The cat’s health bar, 2) The boombox’s health bar, and 3) The mouse’s health bar.
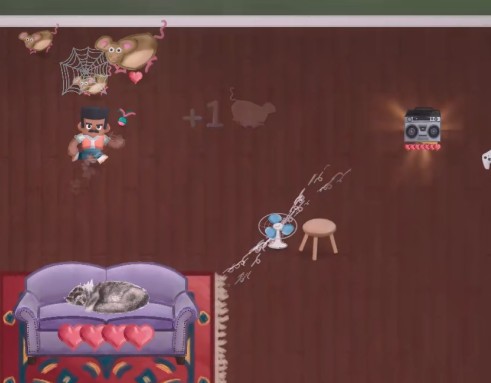
Because we limit the responsibility of the component, it can be easily used in this variety of situations. For each of the entities above, the health is used differently:
- The cat’s health represents if the game is still going or not
- The boombox’s health represents how many music notes it has left
- The mouse’s health represents how many times it can bounce
But all three can reuse the component.
Users of this component can interface with it using a few functions:
func add_hp(hp: int=1):
func remove_hp(hp: int=1):
func set_hp(hp: int):
func get_hp() -> int:
Internally, the component deals with adding heart sprites to its HBoxContainer and dynamically spacing them without its owner needing to worry about it.
Further Reading
Hopefully this article inspires you to come up suitable components for your own game, so that you can avoid the aforementioned danger noodles (I’m referring to spaghetti code in case I’ve been too subtle). If you’re interested in more resources about the Component Patter, you can take a look at:
- https://www.gdquest.com/tutorial/godot/design-patterns/entity-component-pattern/
- https://www.youtube.com/watch?v=74y6zWZfQKk
- https://www.youtube.com/watch?v=rCu8vQrdDDI
And to see the components I’ve mentioned in action, you can play Twinkle Stardust’s Catnap Chaos
Comments
With an account on the Fediverse or Mastodon, you can respond to this post. Since Mastodon is decentralized, you can use your existing account hosted by another Mastodon server or compatible platform if you don't have an account on this one. Known non-private replies are displayed below.